
Ideal for commercial and residential use, asphalt is among the most popular paving materials in the US. According to the American Paving Industry, over 350 million metric tons of asphalt is produced and laid out every year. In fact, over 92 percent of paved road and highways, and 90 percent of parking areas are surfaced with asphalt. A great percentage of public work investments are spent on asphalt overlay projects.
Aside from these public works, asphalt is also used extensively in many domestic installations, such as garages, driveways, parking spaces, private roads, outdoor play areas, and residential landscaping projects. The popularity of asphalt is not entirely surprising considering its durability, aesthetic appeal, and eco-friendliness.
But like other paving materials, asphalt is also subject to wear and tear. According to the National Association of Home Builders, asphalt driveways have an average lifespan between 15 and 20 years when installed by experienced contractors. Exposure to the elements, weather changes, corrosive chemicals, and friction can result in problems. Birdbaths, potholes, cracking, rutting, shoving, raveling, and upheavals are some of the most common asphalt defects to watch out for.
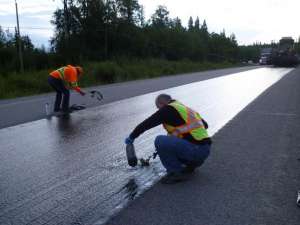
However, sealcoating contractors at ABC Paving emphasize that these defects can be prevented. Asphalt sealcoating is one of the best ways to protect your asphalt and extend its longevity. A quality sealcoat that is carefully applied can enhance the beauty of your parking or driveway. Sealcoating deepens, darkens, and enlivens the color of your asphalt.
When applying sealcoat, proper technique and procedures must be followed to ensure the best results. Ideally, this task should be entrusted to professional seal coating experts. However, if you are thinking of giving your asphalt pavement a fresh DIY sealcoat, here are some things you should know.
Before sealcoating
- Choose the perfect time of the year to do this project. Fall and summer are ideal seasons for sealcoating as the weather is generally predictable. You don’t want the sealcoat to be wasted by sudden rain.
- Sealcoating does not repair any damage. It simply restores and strengthens the outermost layer of the pavement. Before you start sealcoating, make sure your asphalt has a break-free surface. Identify and patch any cracks or holes. Applying this layer on a defective asphalt pavement can only worsen underlying problems. You can use asphalt repair kits available at local hardware shops for minor defects. But if the pavement has major cracks or holes, better ask professional pavers to do the repairs.
- Cover the inner edges of bricks, pavers, or stones that line your driveway. This is to avoid the sealer from coating them.
- Before applying the sealcoat, be sure to thoroughly clean and dry the surface to ensure that the chemicals adhere and set properly.
During sealcoating
- You need to apply the right amount of sealer for it to be effective. The amount needed depends on the floor area and whether it already has an existing sealcoat layer. Surfaces that are to be sealcoated for the first time require more sealer. Usually, sealcoat suppliers will have an estimator or calculator to help you estimate the amount needed.
- If some areas are accidentally coated with a sealer, quickly wash it off using soap and water while the chemical has not set yet. Don’t wait too long before fixing the area.
- Apply two thin coats of sealer. Allow the first coat to set completely before applying another coat. It can take around 8-12 hours for sealers to fully cure and dry. Ideally, you should plan for a two-day project. If you plan to complete the project in one full day, start early and schedule it in summer when days tend to be longer.
After sealcoating
- Sealcoating does not stop with the application of the sealer. Aftercare is a vital part of successful sealcoating. For example, walking on the surface while it is still wet can damage it.
- Apply another coating at least every two years to extend its lifespan. This replenishes the outermost layer that protects the pavement from all the elements.
- Allow the last coating to dry and cure completely (at least 8-12 hours) before you drive or walk on it. Before using it, check to see if the sealer is fully dry. You can rub a towel onto the surface; if it turns black, then the sealcoat is still wet.
There you have some of the most crucial pointers to remember throughout the process of sealcoating your asphalt driveway or garage. Follow these tips to ensure the best outcome!


